TLS Setup Guide
All RPC Node Providers must use a domain name and TLS. Make sure to acquire one using a domain registrar of your choice before following this guide.
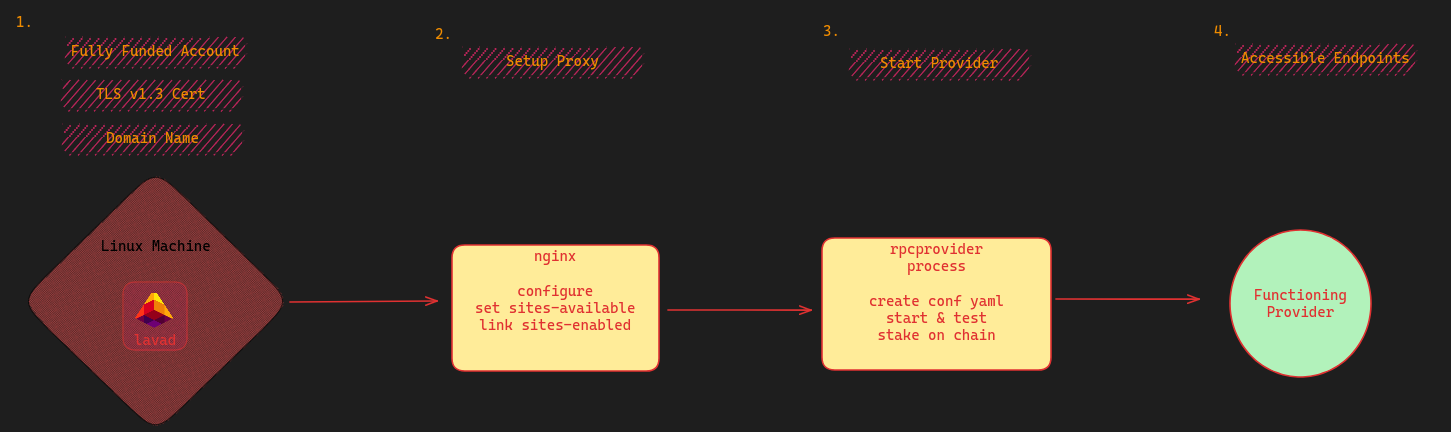
Diagram
Prerequisites
| Required Setup | ? |
|---|---|
| A domain name | ✅ |
lavap is installed & configured | ✅ |
Account with ulava balance | ✅ |
Step 1: Change the A Record on your Domain
The first step of establishing your Provider is to modify some of the DNS settings on the domain you purchased. In specific, you'll need to change the A Records on your domain. Changing your A-Record will create a subdomain that routes traffic to a specific provider process. Depending upon who you've purchased your domain through, A-Records may be visible under Advanced DNS or another label.
Multiple Records (Recommended)
Single Record
Step 2: Install Required Dependencies
We will guide you on setting up and configuring Nginx to use a TLS certificate and handle connections to different Provider processes. It is also possible to use alternative solutions for these two tasks, such as Caddy, Envoy or your preferred solution.
Run the following commands to install the required packages:
sudo apt update
sudo apt install certbot net-tools nginx python3-certbot-nginx -y
Step 3: Generate Certificate
Next, we need to actually create the TLS certificate via the certifying authority. This process is automated by certbot.
Use certbot to create a certificate:
sudo certbot certonly -d you.xyz -d lava.you.xyz -d eth.you.xyz
Note, you will need one -d flag for each subdomain you created as an A-Record. Even if you opted to create a Single Record, you still need to indicate a subdomain for each Provider process you will run. We use the filler you.xyz as an example above.
You may be met with several prompts. Use nginx or Nginx Web Server Plugin when asked.
Step 4: Validate Certificate
Let's make sure your certificate successfully installed! ✅ Input the following command:
sudo certbot certificates
Keep track of your output. If your certificate generation was successful, it should look as following:
Found the following certs:
  Certificate Name: your-site.com
    Domains: your-site.com eth.your-site.com lava.your-site.com
    Expiry Date: 2023-11-07 14:37:29+00:00 (VALID: 84 days)
    Certificate Path: /etc/letsencrypt/live/your-site.com/fullchain.pem
    Private Key Path: /etc/letsencrypt/live/your-site.com/privkey.pem
You'll need both Certificate Path and Private Key Path for your next step.
Step 5: Add an Nginx Config for Each Domain
It is recommended running each chain under a separate Provider process. This will separate error logs and protect against complete Provider failure in the case of a problematic Provider process. The first step of this is to create different nginx routes for each chain.
For each chain that you want to support, you will need to create a separate nginx config file. Create a server file for each chain. Example below shows how to create a server file for Ethereum and Lava Network chains:
- Navigate to the nginx configuration directory:
`cd /etc/nginx/sites-available/
- Create a
serverfiles:
touch eth_server
touch lava_server
- Configure nginx. You will need to select an open port for each chain.
Nginxwill use these config files to create your routes.
- eth nginx server
- lava nginx server
- caddy example
Open the server file:
sudo nano eth_server
Set the configuration:
server {
    listen 443 ssl http2;
    server_name eth.your-site.com;

    ssl_certificate /etc/letsencrypt/live/your-site.com/fullchain.pem;
    ssl_certificate_key /etc/letsencrypt/live/your-site.com/privkey.pem;
    error_log /var/log/nginx/debug.log debug;

    location / {
        proxy_pass http://127.0.0.1:2223;
        grpc_pass 127.0.0.1:2223;
    }
}
Open the server file:
sudo nano lava_server
Add the configuration:
server {
    listen 443 ssl http2;
    server_name lava.your-site.com;

    ssl_certificate /etc/letsencrypt/live/your-site.com/fullchain.pem;
    ssl_certificate_key /etc/letsencrypt/live/your-site.com/privkey.pem;
    error_log /var/log/nginx/debug.log debug;

    location / {
        proxy_pass http://127.0.0.1:2224;
        grpc_pass 127.0.0.1:2224;
    }
}
The below caddy example is to provide guidance only. The recommended route is through nginx. Although making a Provider functional with Caddy is possible you are proceeding at your own risk and with your own expertise.
https://your-site.com:443 {
   reverse_proxy {
    to h2c://127.0.0.1:2221
    transport http  {
        versions h2c 2
    }
   }
   log {
       output file /var/log/caddy/your-site.com.log
   }
}
- In most cases, after creating a configuration file in accessible sites, you need to create a symbolic link to this file in the enabled sites directory. This can be done with a command like:
sudo ln -s /etc/nginx/sites-available/lava_server /etc/nginx/sites-enabled/lava_server
The above examples use ports 443 for external listening and 2223 / 2224 for internal comms, respectively. Using ports other than 443 for external listening means that some users will not be able to connect to your RPC Provider. This can result in less rewards and poorer quality of service. For internal listening, be aware that some ports on your OS may be used for internal communication and should be avoided.
Step 6: Test Nginx Configuration
Now, ensure that your nginx setup is working! ✅
sudo nginx -t
Expected Output:
nginx: the configuration file /etc/nginx/nginx.conf syntax is ok
nginx: configuration file /etc/nginx/nginx.conf test is successful
Step 7: Restart Nginx
You will need to refresh the Nginx server:
sudo systemctl restart nginx
Step 8: Start the RPC Node Provider service
Now that you have Nginx configured you can move to the next step of starting the RPC Node Provider service. Head to the provider setup page for a detailed guide.